Getting Started With WPFunnels

  • Install and Activate WPFunnels
  • How To Upgrade To Pro – WPFunnels
  • How To Install & Activate WPFunnels Pro
  • How To Upgrade Your Plan
  • WPFunnels – Basic Plugin Overview
    • WPFunnels – Plugin Settings Overview
    • WPFunnels Dashboard Overview
    • WPFunnels – Funnel Creation Overview
    • WPFunnels – Funnel Steps Overview
    • WPFunnels – Assigning Funnel Product
    • WPFunnels – Using Order Bump
  • Create Your First Sales Funnel In Less Than 15 Minutes!
  • How To Use Premium Funnel Templates For WPFunnels
  • WPFunnels Free vs Pro

Funnel Planning And Mapping

  • Start Creating A Sales Funnel
  • Import A Pre-built Funnel Template
  • The Visual Drag And Drop Canvas Overview
  • All Types Of Funnel Steps
  • Add Or Remove A Funnel Step
  • Map Your Funnel Steps Properly
  • Decide & Assign The Main Funnel Sales Product
  • Set Discount To The WPFunnels Main Product
  • Checkout Step Configuration Options
  • How To Enable Quantity Selection During Checkout
  • How To Edit Checkout Fields In WPFunnels
  • Using Conditional Steps To Control Funnel Journey
  • Thank You Step Configuration Options
  • Thank You Page Auto Redirect
  • Detailed Analytics Within WPFunnels
  • How To Set A Funnel Page As Homepage

Design Funnel Steps Easily

  • Design Your Funnel Steps With Elementor
    • How To Import Elementor Templates For Funnel
    • How To Design Your Funnel Landing Page – Elementor
    • How To Customize Your Funnel Checkout Page Design – Elementor
    • How to Use Multi-Step Checkout – Elementor
    • How To Change Order Bump Position At The Checkout Step – Elementor
    • How To Design Your Funnel Thank You Page – Elementor
    • How To Design Your Funnel Custom Page – Elementor
    • How To Design Upsell or Downsell Offer Page – Elementor
  • Design Your Funnel Steps With Gutenberg
    • How To Import Gutenberg Templates For Funnel
    • How To Design Your Funnel Landing Page – Gutenberg
    • How To Customize Your Funnel Checkout Page – Gutenberg
    • How to Use Multi-Step Checkout – Gutenberg
    • How To Change Order Bump Position At The Checkout Step – Gutenberg
    • How To Design Your Funnel Thank You Page – Gutenberg
    • How To Design Your Funnel Custom Page – Gutenberg
    • How To Design Upsell or Downsell Offer Page – Gutenberg
  • Design Your Funnel Steps With Divi Builder
    • How To Import Divi Templates For Funnel
    • How To Design Your Funnel Landing Page – Divi Builder
    • How To Design Your Funnel Checkout Page – Divi Builder
    • How to Use Multi-Step Checkout – Divi Builder
    • How To Design Your Funnel Thank You Page – Divi Builder
    • How To Design Your Funnel Custom Page – Divi Builder
    • How To Design Upsell And Downsell Page – Divi Builder
  • Design Your Funnel Steps With Oxygen Builder
    • How To Import Oxygen Templates For Funnel
    • How To Design Your Funnel Landing Page – Oxygen Builder
    • How To Design Your Funnel Checkout Page – Oxygen Builder
    • How to Use Multi-Step Checkout – Oxygen Builder
    • How To Design Your Funnel Thank You Page – Oxygen Builder
    • How To Design Upsell And Downsell Page – Oxygen Builder
    • How To Design Your Funnel Custom Page – Oxygen Builder
  • Design Your Funnel Steps With Bricks
    • How To Import Bricks Templates For Funnel
    • Design Funnel Landing Page Using Bricks
    • How To Customize Your Funnel Checkout Page Design – Bricks
    • How To Design Upsell or Downsell Offer Page – Bricks
    • How To Design Your Funnel Thank You Page – Bricks

Order Bump At The Checkout

  • How To Add An Order Bump At The Funnel Checkout Page
  • How To Change Order Bump Position At The Checkout Step
  • How To Use Exclusive Order Bump Templates

One-click Upsell And Downsell Offers

  • How To Add An Upsell or Downsell Offer To Your Funnel
  • How To Assign The Offer Product To Your Upsell or Downsell Step
  • How To Design Your Upsell or Downsell Offer Page
  • How to use Variable Products as Upsell / Downsell offer product

Sales Funnel Offers To Boost Your Sales

  • Order Bump Offer At The Checkout
  • One-click Upsell & Downsell Offers After Checkout
  • How To Add Exclusive Discount To Your Offer Products
  • How To Replace Main Product With Offer Product
  • How To Use Variable Products In WPFunnels Checkout

Supported Payment Gateways

  • How To Use Cash on Delivery
  • How To Use Direct Bank Transfer – BACS
  • How To Use Check Payments
  • How To Connect PayPal
  • How To Connect Stripe
  • How To Connect Mollie
  • How To Connect Authorize.Net
  • How To Connect Sumit
  • How To Connect PayFast
  • How To Connect Square
  • How To Connect WooCommerce Payments
  • How To Hide Unsupported Payment Gateways On Funnel Checkout
  • How To Skip Offers For Unsupported Payment Gateways

Funnel Integrations

  • CRM Integration
    • How To Integrate With FluentCRM – WPFunnels
    • How To Integrate With MailPoet – WPFunnels
    • How To Integrate With ActiveCampaign – WPFunnels
    • How To Integrate With MailChimp – WPFunnels
    • How To Integrate With Constant Contact – WPFunnels
    • How To Integrate With AWeber – WPFunnels
    • How To Integrate With Sendinblue – WPFunnels
    • How To Integrate With MailerLite – WPFunnels
    • How to Integrate With GetResponse – WPFunnels
    • How to Integrate With Encharge – WPFunnels
    • How To Integrate With HubSpot – WPFunnels
    • How To Integrate With ConvertKit – WPFunnels
    • How To Integrate With Pabbly – WPFunnels
  • Zapier Integration
  • WP Fusion Integration
  • Facebook Pixel Integration
  • Google Tag Manager Integration
  • UTM Parameters

Global Funnels For WooCommerce

  • Global Funnel For All Products In WooCommerce Store
  • Global Funnel Based On WooCommerce Product Category
  • Global Funnel Based On WooCommerce Product Tag
  • Global Funnel Based On WooCommerce Shipping Class
  • Global Funnel For A Specific Product In WooCommerce Store

Lead Generation Funnel

  • How To Use WPFunnels Optin Form – Elementor
  • How To Use WPFunnels Optin Form – Gutenberg
  • How To Use WPFunnels Optin Form – Divi
  • How To Use WPFunnels Optin Form – Oxygen
  • How To Set reCAPTCHA For WPFunnels Optin Form

WPFunnels Shortcodes

  • How To Use Shortcodes To Create A Functional Sales Funnel
  • Shortcode For WPFunnels Optin Form
  • Shortcode For WPFunnels Next Step Button
  • Shortcode For Sales Funnel Checkout
  • Shortcode For Sales Funnel Offer Button
  • Shortcode For Sales Funnel Order Details
  • How To Use WPFunnels Shortcode In Breakdance Builder
  • How To Use WPFunnels Shortcode In Zion Builder
  • How To Use WPFunnels Shortcode In Beaver Builder
  • How To Use WPFunnels Shortcode In Thrive Architect
  • How To Use WPFunnels Shortcode In Bricks Builder

WPFunnels – Compatibility With Multisite Network

  • How to Activate WPFunnels License on Multisite?

Troubleshooting For WPFunnels

  • How To Disable Caching
  • How To Fix ‘Not Getting Plugin Update’
  • How To Fix Oxygen Builder Issues
  • How To Change WPFunnels Template Layout

WPFunnels Webhooks Support

    Sales Funnels For Courses

    • WPFunnels + LearnDash with WooCommerce
      • Basic Requirements To Sell Courses (WPFunnels + LearnDash with WooCommerce)
      • How To Create A Sales Funnel For Your Courses Using LearnDash + WooCommerce
    • WPF LMS Funnel Addon – WPFunnels + LearnDash WITHOUT WooCommerce
      • Basic LearnDash Tutorials For Course Creation
      • Minimum Requirements (WPFunnels + LearnDash Integration)
      • Activating & Using The LMS Funnel Addon For Course Funnels
      • Assign A Course To Sell Using This Funnel
      • Configure Course Funnel Enrollment Checkout
      • Configuring Order Bump Offers For Your Courses
      • Setting Up The Upsell or Downsell Offer for Course Funnel
      • Setting Up The Course Funnel Thank You Page
      • How To Add Exclusive Discount To LearnDash Courses In Your Funnel
    • WPFunnels + Thrive Apprentice with WooCommerce
      • Basic Requirements to Sell Courses (WPFunnels + Thrive Apprentice with WooCommerce)
      • How To Create A Course Funnel For Thrive Apprentice + WooCommerce

    WPFunnels A/B Testing

    • How To Set Up A/B Testing For WPFunnels Steps

    Export And Import Funnels

      WPFunnels New UI

      • How To Create A Funnel Journey Using The WPFunnels New UI
      • How To Configure Conditional Actions In Funnel
      • How To Remove A Funnel Step From Funnel Journey
      • Funnel A/B Testing With New UI
      • New Funnel Automation UI With Mail Mint

      Checkoutify Documentations And Guides

      • How To Install & Activate Checkoutify Pro – Checkout Customizer
      • How to Customize WooCommerce Checkout Using Checkoutify – Checkout Customizer
      • How to Replace Your WPFunnels Checkout Using Checkoutify – Checkout Customizer

      Getting Started With Mail Mint

      • How To Install And Activate Mail Mint
      • Basic Plugin Overview – Mail Mint
      • How To Install And Activate Mail Mint Pro

      Mail Mint Settings

      • Mail Mint (Incoming) Webhooks Settings
      • reCAPTCHA Verification In Mail Mint
      • How To Set Up Email Sending Frequency In Mail Mint

      Mail Mint Contacts

      • How To Add New Contacts Manually In Mail Mint
      • How to Import Contacts Using CSV File In Mail Mint
      • How To Paste Contact Info To Import Contacts In Mail Mint
      • How To Import MailChimp Contacts In Mail Mint
      • How To Import WordPress Users In Mail Mint
      • How To Import EDD Customers In Mail Mint
      • How To Create Tags For Your Contacts
      • How To Create Lists To Organize Contacts
      • How To Create Segments To Target Qualified Leads
      • How to Export Contacts From Mail Mint
      • How To Create Custom Contact Fields In Mail Mint
      • Mail Mint Contact 360 Degree Overview
      • How To Import Contacts From LearnDash To Mail Mint
      • How To Import Contacts From MemberPress To Mail Mint
      • How To Import Contacts From Tutor LMS To Mail Mint
      • How To Import WooCommerce Customers In Mail Mint

      Mail Mint Campaigns

      • How To Create And Send Regular Email Campaigns In Mail Mint
      • How To Create And Send Email Sequence Campaigns In Mail Mint
      • How To Create An Email Sequence For Automation In Mail Mint
      • How To Create And Send Daily Recurring Email Campaigns In Mail Mint
      • How To Create And Send Weekly Recurring Email Campaigns In Mail Mint
      • How To Create And Send Monthly Recurring Email Campaigns In Mail Mint

      Mail Mint Automation

      • Automation Recipes – Ready Automation Workflows
      • How To Create Email Marketing Automation – WordPress Triggers
      • How To Create Email Marketing Automation – Mail Mint Triggers
      • Utilize WooCommerce Triggers in Mail Mint Automation
      • Email Automation For EDD Triggers – Easy Digital Downloads + Mail Mint
      • Check Your Email Marketing Automation Performance with Mail Mint
      • How To Use Action Based Conditions In Email Automation
      • How To Use Outgoing Webhooks Automation In Mail Mint
      • How To Create Coupon In Mail Mint Automation
      • How To Delete Coupon In Mail Mint Automation

      Mail Mint Form For Lead Generation

      • How To Create A Custom Opt-in Form For Collecting Leads
      • How To Create Button Click Pop-Up Form In Mail Mint
      • How To Enable Admin Notification For Mail Mint Form
      • How To Set Time Delay In Mail Mint Pop-up Form
      • Support For Mail Mint Form As WPFunnels Optin form

      Mail Mint Email Builder

      • How To Use Product Block In Email Builder For Sending Product Suggestion Emails
      • How To Use Post Block In Email Builder For Sending Post Updates
      • How To Use A Fallback Value In Emails For Merge Tags (Personalized Tags)
      • The Email Templates Hub – Design & Store Your Own Emails
      • Customize Woocommerce Transactional Emails With Mail Mint

      Mail Mint Integration With Visual Funnel Canvas

      • How To Create Marketing Automation with WPFunnels And Mail Mint

      Mail Mint Integration With Form Builders

      • How to Use Elementor Form And Mail Mint To Collect Leads
      • How to Use JetForm Builder And Mail Mint To Collect Leads
      • How To Use Gravity Forms And Mail Mint To Capture Leads
      • How To Use Fluent Forms And Mail Mint To Capture Leads
      • How To Use Contact Form 7 And Mail Mint To Capture Leads

      Mail Mint AI Integration

      • Connect Mail Mint With ChatGPT – OpenAI
      • Create Email Subject Lines And Preview Texts With ChatGPT
      • How To Create Compelling Email Copies With ChatGPT – OpenAI

      Abandoned Cart Recovery In Mail Mint

      • How To Enable The Abandoned Cart Feature In Mail Mint
      • How To Observe Abandoned Cart Details In Mail Mint
      • Automation Triggers For WooCommerce Abandoned Cart Recovery | Mail Mint
      • How To Add Cart Details In Abandoned Cart Recovery Emails

      Mail Mint Integrations

      • MemberPress Integration With Mail Mint
      • LearnDash Integration With Mail Mint
      • Tutor LMS Integration With Mail Mint
      • ZeroBounce Integration With Mail Mint For Email Validation
      • Twilio Integration With Mail Mint

      Troubleshooting For Mail Mint

      • Email Sending Limits
      • How To Create Mail Mint Default Pages
      • Compatibility With SMTP Plugins
      Links
      1. Home
      2. Docs
      3. Funnel Integrations
      4. CRM Integration
      5. How To Integrate With FluentCRM – WPFunnels

      How To Integrate With FluentCRM – WPFunnels

      If you’re using a CRM tool, you know how useful it is for managing relationships and interactions with your active and potential customers.

      One of the most popular and complete CRM solutions you can find in WordPress is the FluentCRM plugin.

      And from now on, you can connect WPFunnels with FluentCRM to set up automations based on different triggers.

      In this guide, you’ll learn how to create automated workflows by integrating WPFunnels with FluentCRM:

      Step 1: Create a List in FluentCRM

      To use the WPFunnels plugin, at first you need to make sure that the following plugins are installed and activated on your sites:

      • WPFunnels – Pro
      • WooCommerce
      • FluentCRM

      Once the plugins are installed, you also need to make sure that the WPFunnels Pro License is activated.

      Now, Segment your audience or contacts with multiple lists, and tags in FluentCRM.

      You can learn to segment your audience in FluentCRM by following this simple guide.

      Step 2: Enable Integration in Funnels 

      First, you will have to create a new funnel or edit an existing one.

      Now, Click on the [+ Integration] button on the top left side of your canvas. Click on this button to integrate your funnel with other tools.
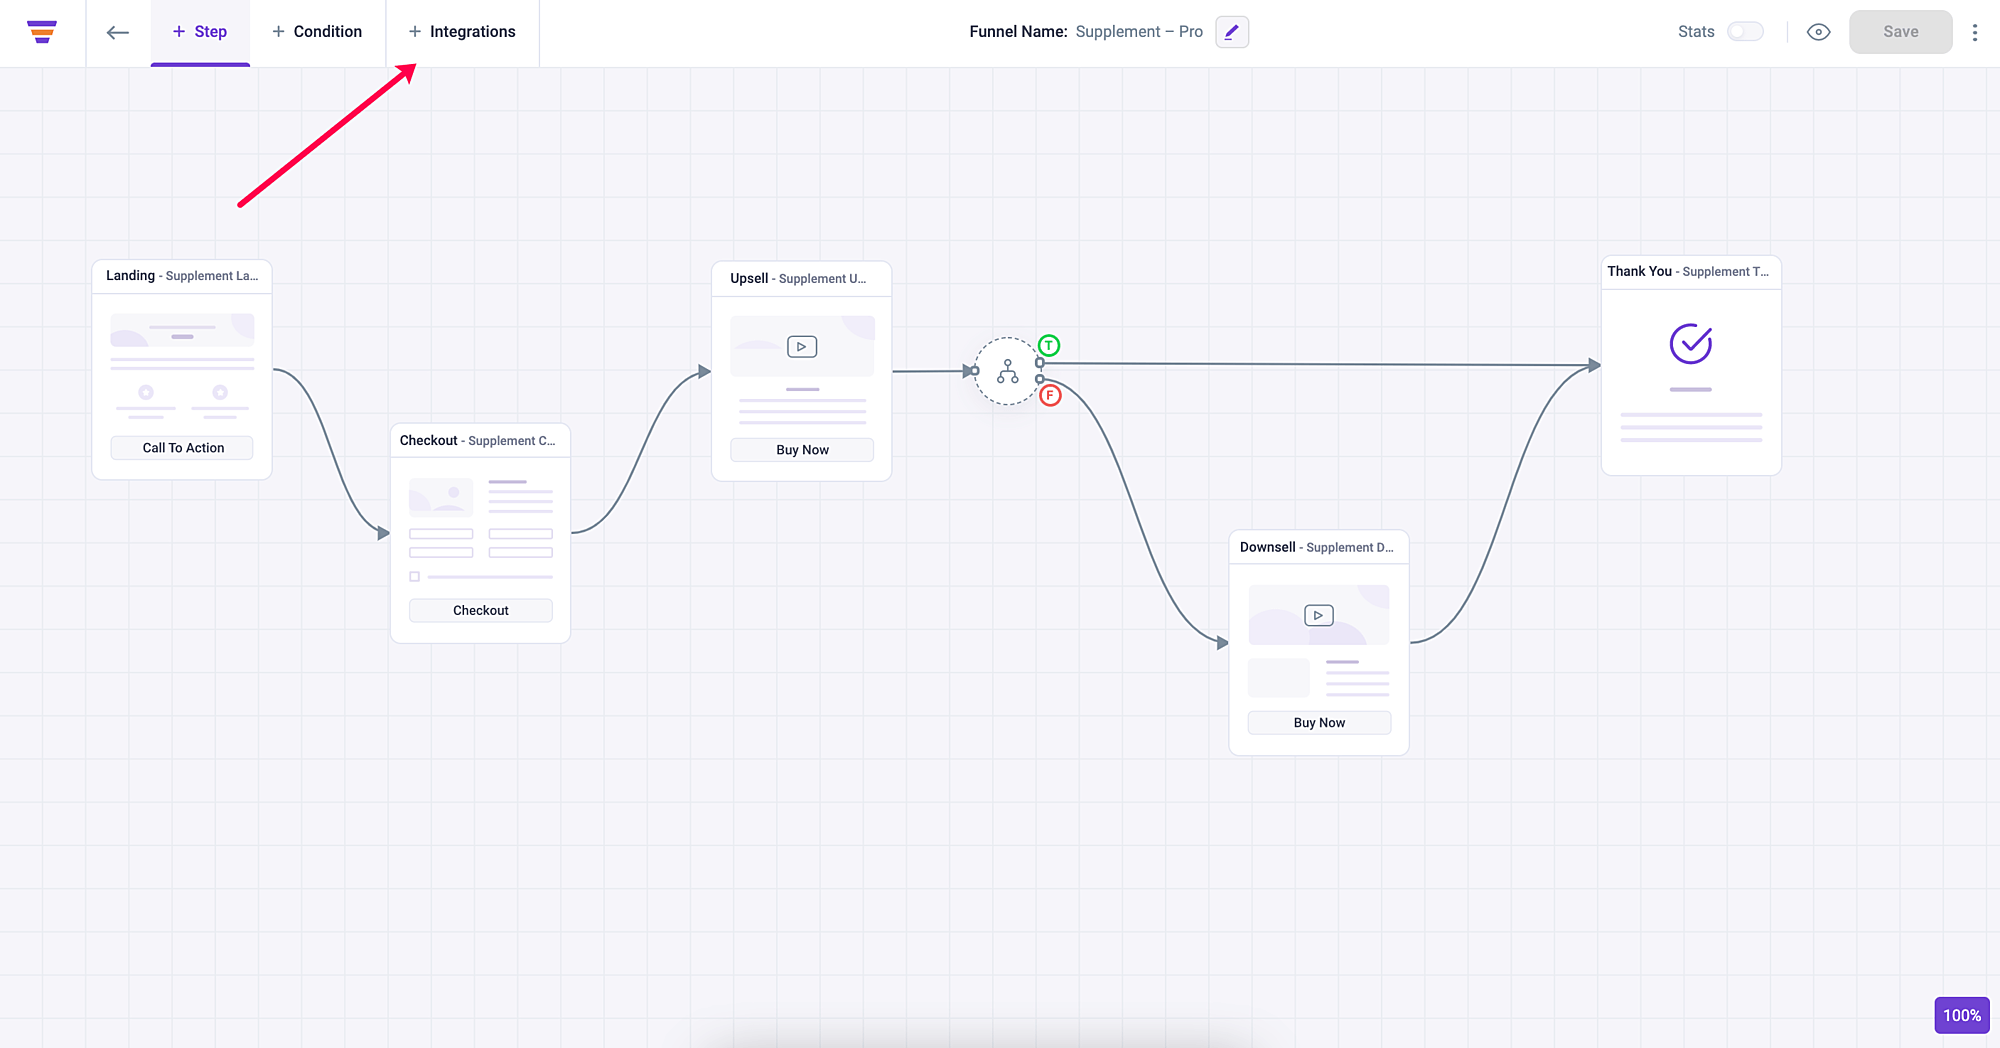
      Integration button on funnel canvas

      Once you click on this, you’ll be able to see a drawer with the Add New Integration button.

      Add new integration button

      After clicking on the button you’ll see options to Edit the name of the Integration and Connect CRM option.

      Edit integration name & connect CRM

      Click on the drop-down bar and select FluentCRM. As of now, we’re only offering integration with FluentCRM but in the future, we’ll make WPFunnels compatible with popular CRM tools.

      After selecting the CRM, you’ll be able to get three options there such as User Event, Add to List, and Assign Tag.
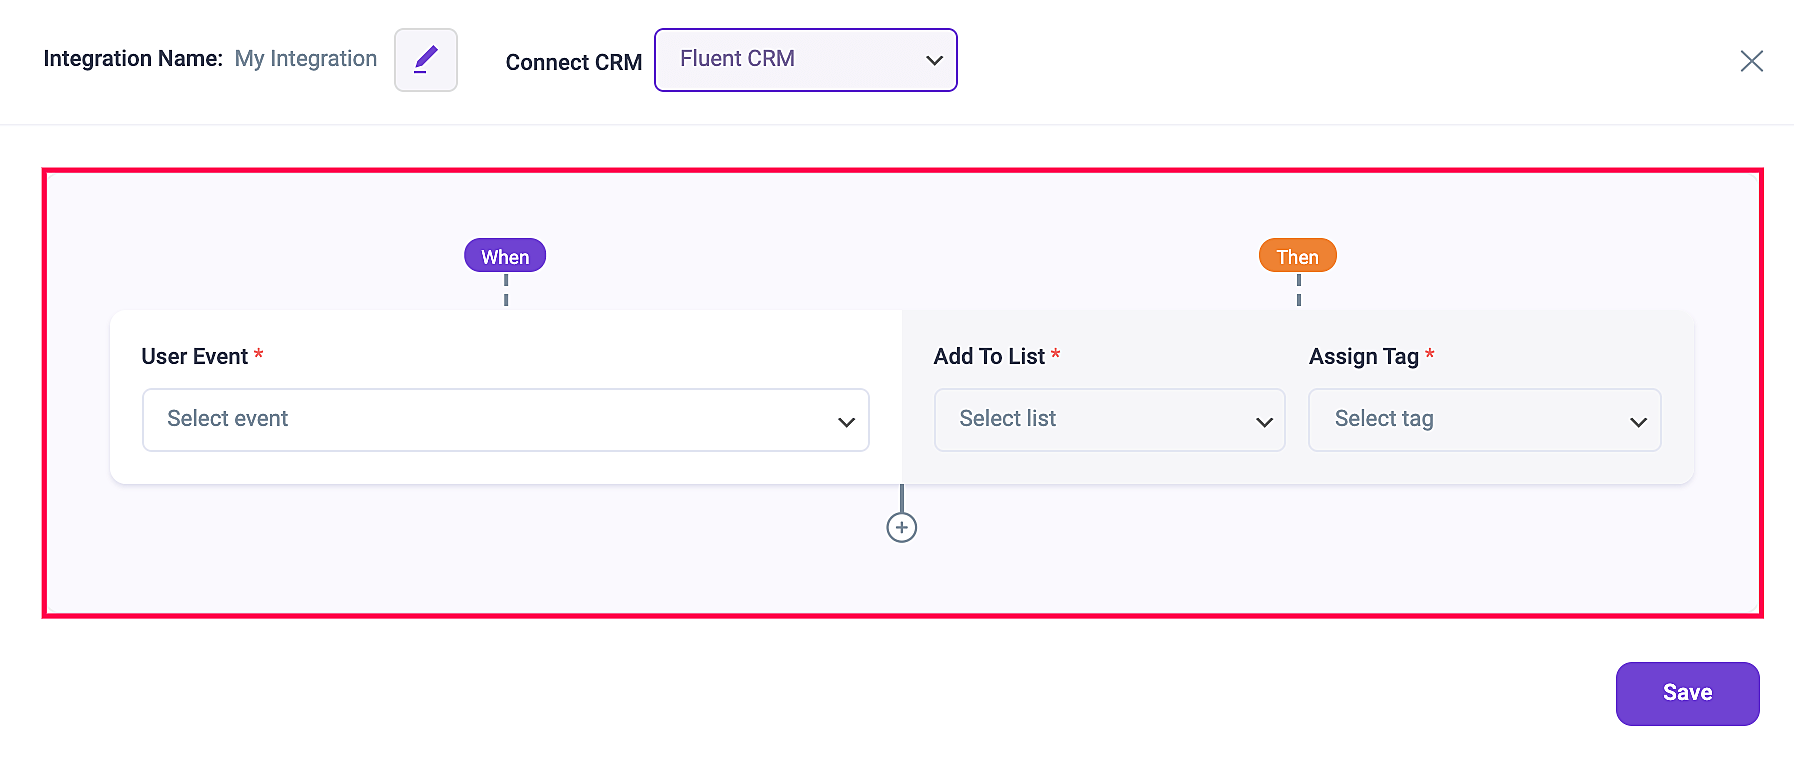
      Set up integration

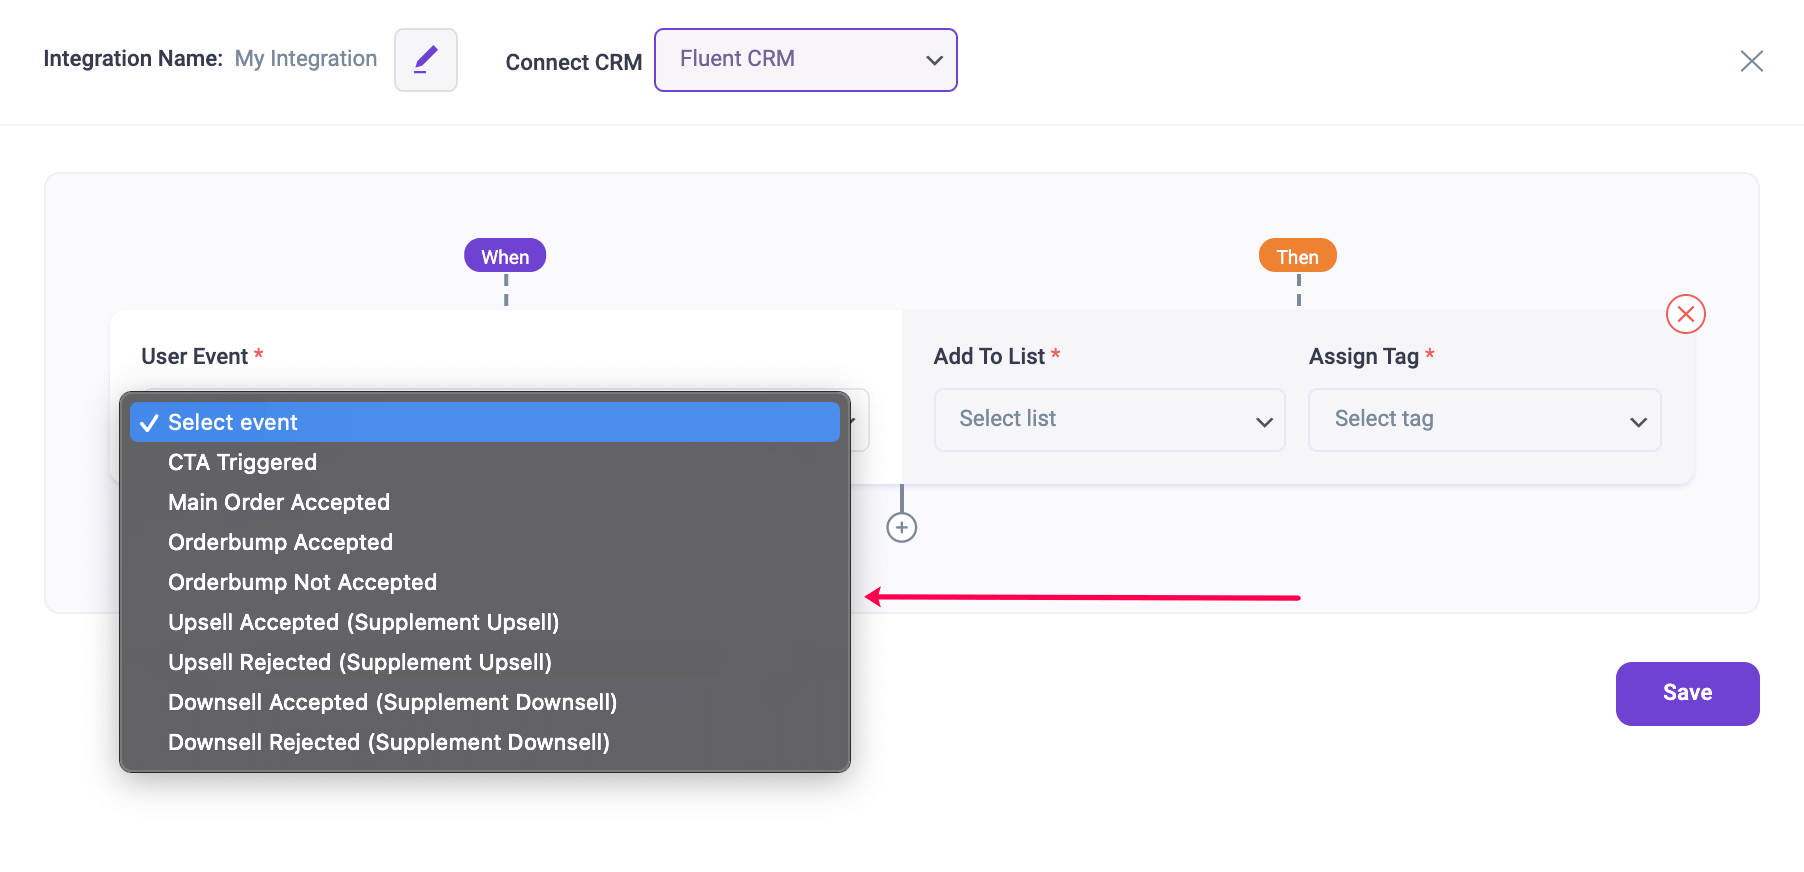
      Now, Click on the drop-down button below the User Event and you’ll get the following triggers:

      • CTA Triggered
      • Order Bump Accepted
      • Order Bump Not Accepted
      • Upsell Accepted
      • Upsell Rejected
      • Downsell Accepted
      • Downsell Rejected
      Integration - select user event

      Here the trigger designates an action that initiates subsequent actions in the sales funnel workflow.

      As of now, I’m selecting Order Bump Accepted as the User Event.

      Once you have added the user event, it’s time for you to pass the selected trigger the list that you’ve already created in FluentCRM.
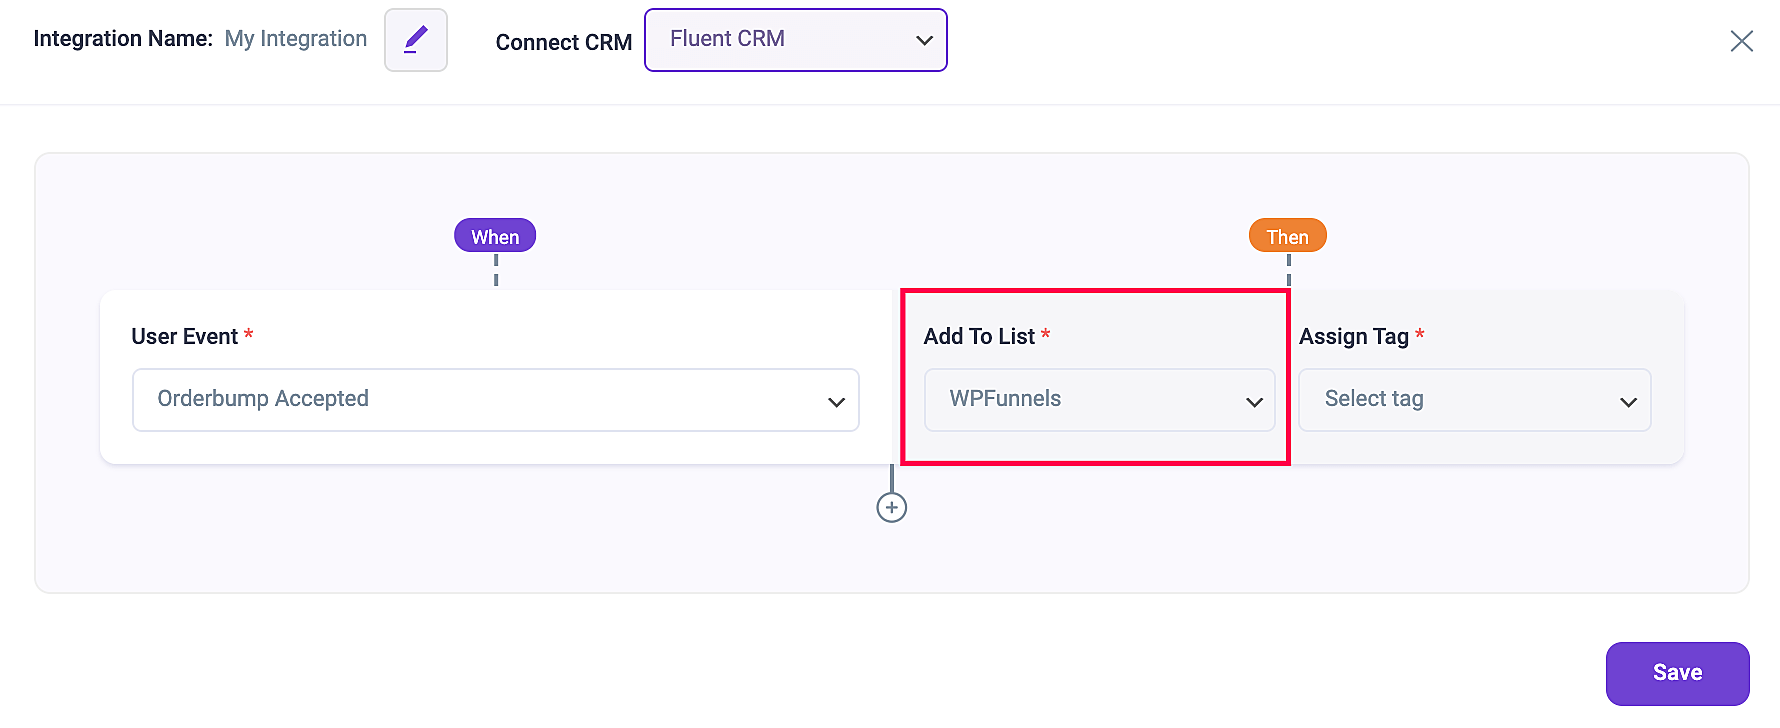
      Integration - add to list

      Now, click on the drop-down button and assign the preferred tag that you’ve already created in FluentCRM. And, then click on Save Changes.
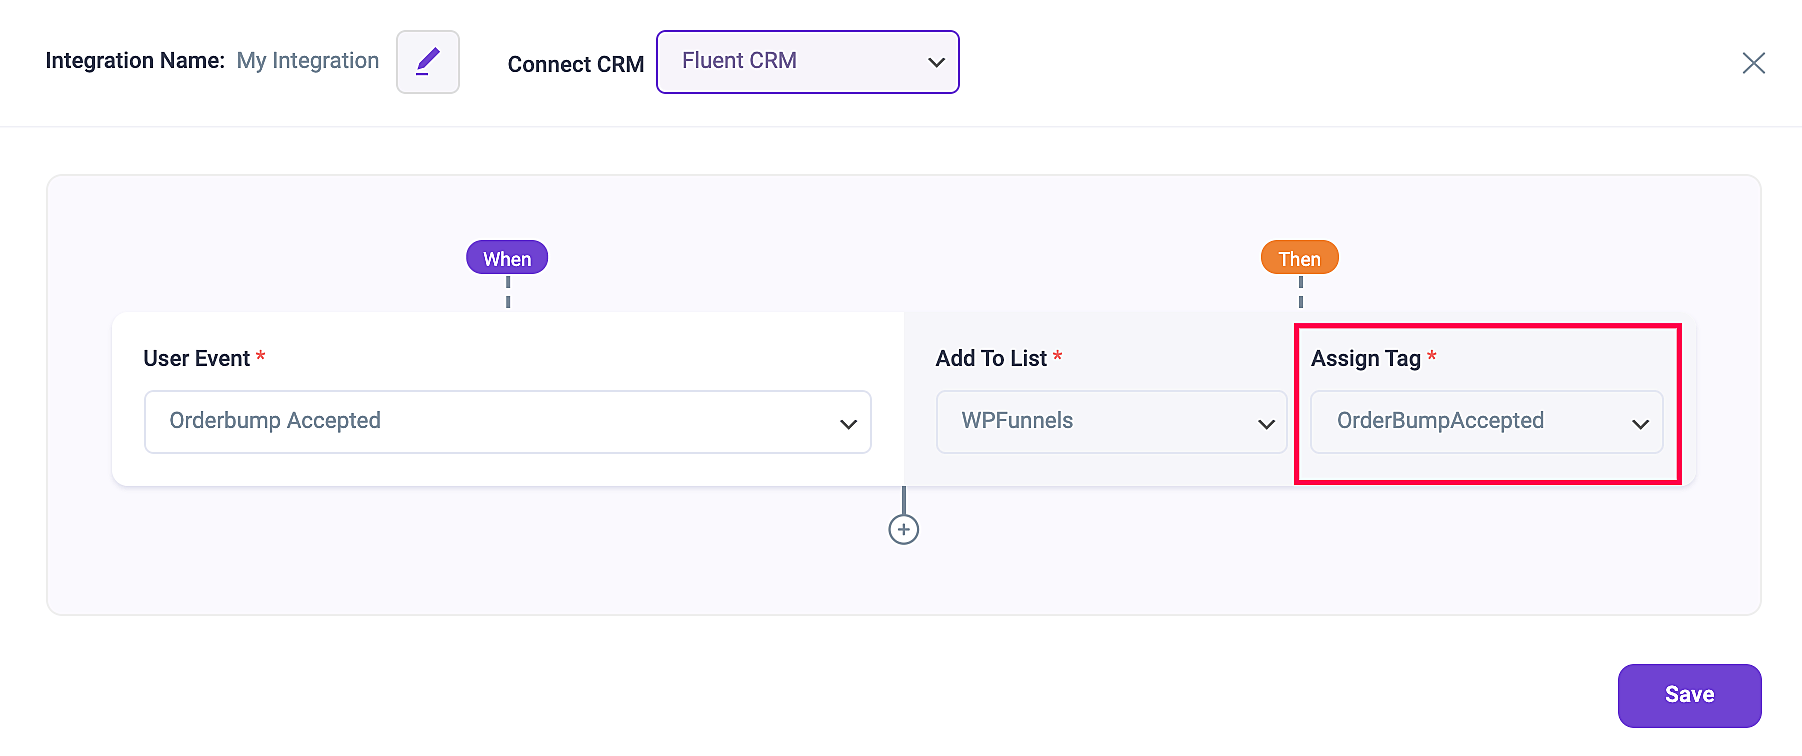
      Integration - assign tag

      You can also add another trigger by clicking on the plus sign below the condition.
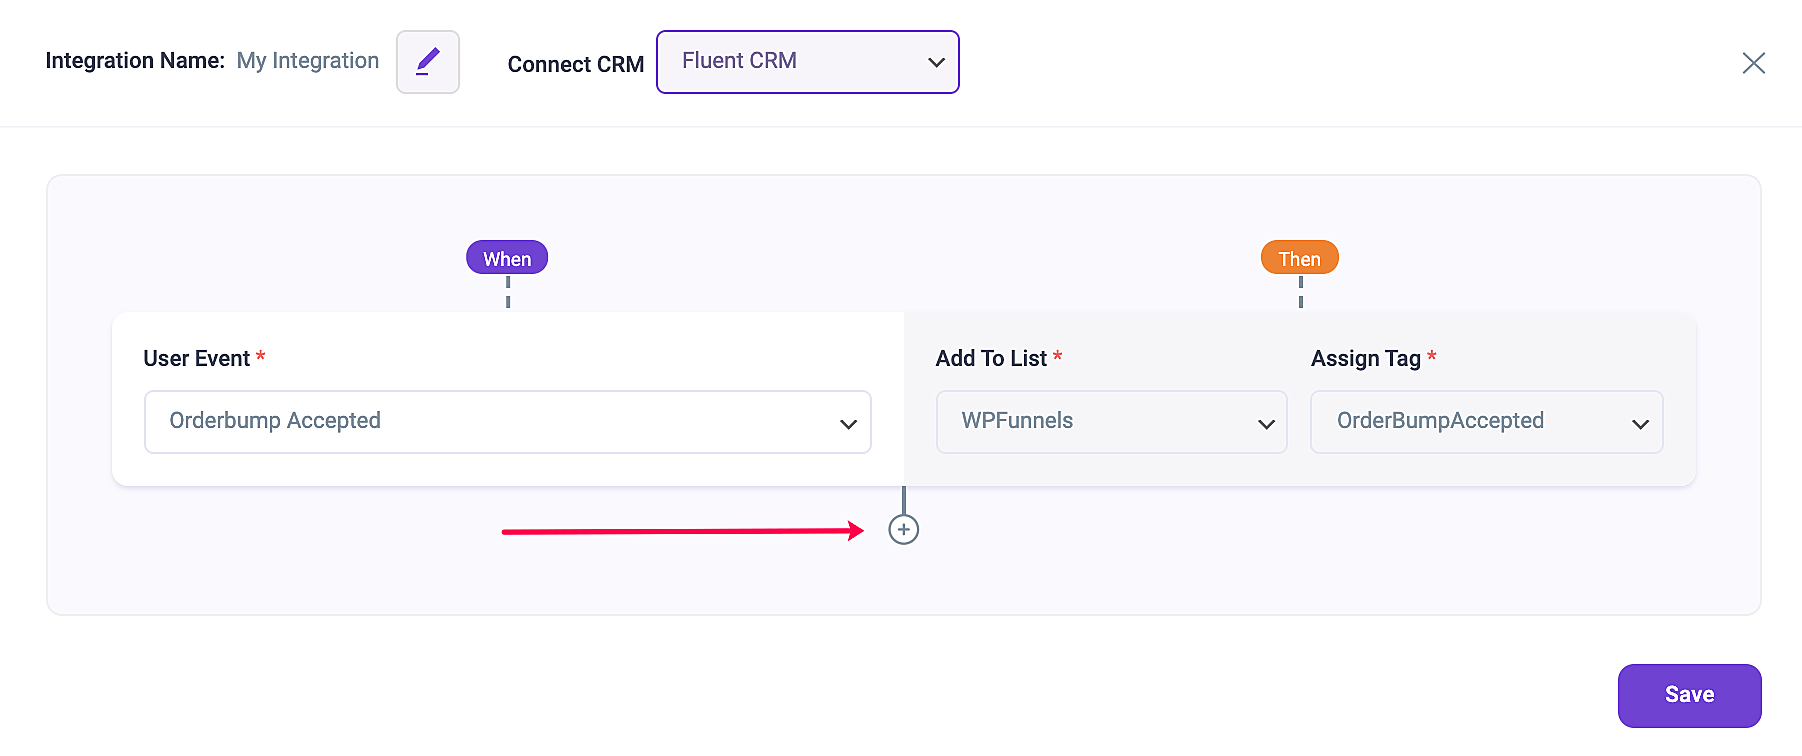
      integration - add new user event

      So, whenever a prospect takes a specific action, user details will be passed out to the mentioned list with assigned tags. And thus you’ll be able to run the required Automation in FluentCRM easily.

      That’s it! This is how you can connect your CRM and capture leads using WPFunnels.

      How can we help?

      Table Of Content

      Step 1: Create a List in FluentCRM
      Step 2: Enable Integration in Funnels